DIY Tutorial - How to Make a Dragon Halloween Costume
(Note: Some links in this post are affiliate links, and we will be compensated when you make a purchase by clicking through our links. Read our disclosure policy here.)
We love Halloween around here. Mostly because it allows us to be super creative and silly. Each year we think of a new theme and make our costumes around that theme. This has become one of our favorite family traditions. It allows us to tackle new challenges and make lasting memories together. It's hard to believe we have 10+ years of DIY Halloween costumes under our belt and we're still going strong.
This year for Halloween we picked a Mythical Chacater theme, which includes a gnome, unicorn, and fairy.
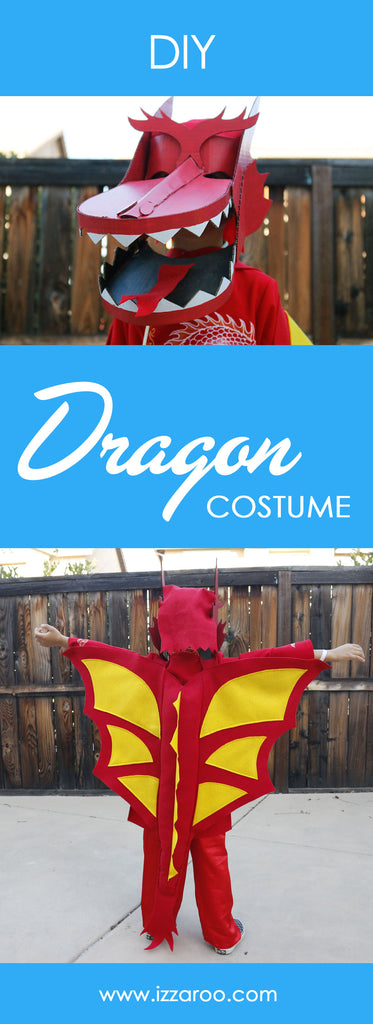
Here is the DIY tutorial on how to make a dragon costume.
WINGS
Materials:
-
Red felt
- 1 yard
-
Yellow felt
- 1/2 yard
-
Poly-Fil
-
1/4" elastic band
- 10"
-
Hook/Loop tape
(velcro) - 2"
Links to buy the supplies you will need:
Instructions:

For the dragon wings and body/tail, we drew and cut the patterns from large paper, we like the large rolls of painter paper available at Home Depot. The wings are the width of our son's arms spread outward from wrist to wrist, with the wings' height going from our son's neck to behind his knees. The body/tail pattern is 6" wide and goes from the top middle of the wings to our son's ankles, the length can be adjusted to the preferred height of the child. Now we have the paper patterns to cut the felt.

Trace the paper patterns onto the red felt. Cut out the wings and body/tail from the red felt.

Cut out a row of body spikes from the yellow felt to match the height of the tail but stop the spikes 9" short from the tip of the tail to allow room to sew the spikes into the red body/tail piece.

Pin the row of yellow spikes in the center of the red body/tail. With the red body/tail pinching the yellow spikes, sew down the center on backside of red body/tail to capture yellow spikes.

Cut wing panels from the yellow felt. The shapes can vary. The yellow wing panels are sewn to the red wings on the backside (away from the body) only.

The body/tail piece is sewn to the wings between the yellow wing panels. Be sure to leave space under the body/tail piece to allow the body/tail to be stuffed with poly-fil.

Once the body/tail piece is sewn to the wings, a neck strap is required to hold the wings up closer to the body.

The neck straps are 2" wide by 7" long, adjust the length by child's size. Hook/loop tape is sewn to the neck straps to attach the two ends of the neck straps. The 1/4" elastic is sewn into two loops at both ends of the wings to become the wrist loops for the child.

The body/tail is then stuffed with poly-fil. Our son used his light saber to push the poly-fil into the body/tail piece. Then sew the body/tail shut at the top to keep in the poly-fil.

Your dragon wings are done! Our son loved flapping his wings with the wrist loops.
MASK
Materials:-
Thick cardboard
- A few large boxes
-
Red acrylic non-toxic paint
- 1 bottle
-
Black acrylic non-toxic paint
- 1 bottle
-
Red felt
- 12" x 6" piece
-
Hot glue gun
Links to buy the supplies you will need:
Instructions:

Our son loves dragons. He was so excited to create a dragon costume for Halloween.

Create a cardboard ring around the head to be the main base of the mask.

Our son wanted to look out through the dragon's eyes.
- Cut a piece of cardboard to create the forehead and top of the mouth.
- Cut the cardboard for a row of teeth that is the same length as the circumference of the top of mouthpiece.
- Cut a nose bridge from the cardboard.

- Hot glue the row of teeth to the outer edge of the top of mouth piece.
- Hot glue the nose bridge in the center of the top of mouthpiece.

The forehead section of the top of mouth piece is glued to the head band.

A top band is added to the head band to keep the mask on our son's head.
- Cut two side ears/horns then glue them to the head band and top of mouth piece.

- A brow is cut from cardboard to add above the nose bridge for more detail.
- The bottom jaw is created from cut cardboard piece to make the bottom of the mouth
- Add a row of teeth
- Add two side wing pieces.

The assembled bottom jaw is glued to the upper mouth by gluing the two side wing pieces to the sides of the top jaw.

We added two cut ovals as nostrils for an extra detail.

The mask is now ready to paint.
- Our son wanted to be a red dragon.
- He left the teeth the white color of the cardboard for a fierce look.
- The inside of the mouth is painted black.
- A red felt tongue is added inside the mouth for the final touch.


This costume was 1 of 4 mythical character themed costumes we made for our family this year. Check out tutorials for the gnome, unicorn, and fairy costumes.
Did you know we make our costumes every year?! See all our past Halloween costumes for more fun ideas.
For extra help making your costumes, see the video tutorials on our YouTube channel.
I hope this inspires you to #CREATEmore and make lasting memories for your family. I would love to hear your thoughts, comments, questions in the comments section below.
If you make your own version we'd love to see! Tag #IZZAROOcostumes for a chance to be featured on our website.
If you haven't already, check out our shop. 10% of net profits will benefit organizations that empower underprivileged youth. Learn more about our mission to Be The Good.


